Assuming you are left with 50 bucks, there is no need to panic. You can build your very own vintage gaming rig that you can use on any HDMI- enabled Tv or Monitor. This is why you should play your focus around this Guide for everything you need to do to play the game is considered. At first, you must have thought of the reason why we are making use of RetroPie. Then what is RetroPie?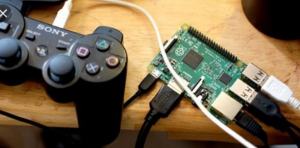
What RetroPie is
RetroPie is a software library used in making video games on the Raspberry Pi computer. This is graded among one of the most popular Raspberry Pi projects 0f today and the most popular system for emulating the Raspberry Pi. RetroPie is software that features a user-friendly, having a friendlier setup process.
How this works
RetroPie runs Emulation Station and supports all major retro video game emulators, thereby allowing you to play games from the NES, SNES, Genesis, Atari, and more on your Pi. However, you can become your own Raspberry Pi emulator.
There are reasons why developers called it RetroPie instead of RetroPi which I do not concur with. This is because any Raspberry Pi model can run RetroPie, but I recommend using the Raspberry Pi 3 B+ since it deals with more powerful GPU, CPU, and RAM capabilities that order the minimal range of games you can play.
Below are what you need to complete this guide
Raspberry Pi 3 B+ = 1
USB gamepad = 1
Micro SD card, 32GB = 1
Screwdriver, Philips = 1
HDMI cable = 1
Raspberry Pi 3 case = 1
Raspberry Pi power supply, 2A = 1
retropie raspberry pi 4
Now we move over to the steps to make this a success
Step1: place your Raspberry Pi into its case.
Before now, Raspberry comes without a case. But however, I support you buy a case to avoid damaging your Pi. Now when you get the case, you can then use a screwdriver to place it into its case. Sometimes, you do not need to force screwdriver on some cases but I had preferred cases that fit in while you make use of screws to secure the Pi from extra instability.
This is why at first I recommended Raspberry Pi 3 case before we got to this point. Most times, it also comes with small aluminum heat sinks for the CPU and GPU, because the Pi 3 can heat-up when emulating certain games. This case also gives you access to your GPIO pins if needed for other projects as though these pins will not be used for this guide.
Note recommendation. assuming you are using a Raspberry Pi Zero, you can also use an NES cartridge as a case for your RetroPie gaming rig.
Step2: Download the RetroPie SD card image.
In this segment, we will consider performing a RetroPie setup using an SD card image. Most importantly, it is going to be a snapshot of an entire working installation of RetroPie rather than doing a manual RetroPie installation.
However, RetroPie is a software package for the Raspberry Pi that deals in Raspbian OS, a Linux distribution. Most importantly, it combines a full suite of tools and utilities that allows you to quickly and easily run retro game ROMs for various vintage gaming emulators.
The essence of this micro SD card is because the Raspberry Pi doesn’t have an internal hard drive for storing the entire operating system and all files contained in it.
Now to set up RetroPie, you should consider Downloading RetroPie SD card image and also to unzip the latest RetroPie SD-Card Image. At most, there are two versions of the RetroPie SD-Card Image:
- One for the Raspberry Pi Zero, Zero W, A, B, A+ and B+
- One for the Raspberry Pi 2 and Raspberry Pi 3
Now you have to ensure you choose the appropriate image for your Pi.
Step3: Format Your SD card to work with Raspberry Pi.
Now to format the SD card you are to place it into an SD card reader. Your SD card will now show up as a mounted drive on your computer. There are also ways you can use in formatting the SD card which is stated below.
N/B: If your SD card is 32GB or smaller, then we will format it as MS-DOS (FAT). But if your SD card is 64GB or larger, we will format it as ExFAT.
Formatting on Windows
Open up Explorer; locate the SD card and right-click on it. Click on Format from the context menu. Pick the desired format and click the Start button.
Formatting on Mac
Next is to open Disk Utility. To locate it, navigate to Applications > Utilities > Disk Utility. Select your SD card in the left panel. Highlight and choose the desired format. You can also give it a name, and click the Erase button. But for OS X Yosemite and older, you’ll need to navigate to the Erase tab first.
Step 4: Install the RetroPie image.
To install RetroPie, let us make use a third-party utility called Etcher. I recommend using Etcher because it works on both Windows and Mac.
Download and install Etcher, open it, and select your SD card drive and downloaded image to “flash” the image to your SD card.
Step 5: place the SD card into your Raspberry Pi and connect your peripherals.
Now place the SD card into your Raspberry Pi.
Following the sequence, connect your USB game controller and connect the HDMI cable to a monitor or TV. Finally, you can then connect the Micro-USB power supply.
N/B: Always connect the power supply after connecting your other peripherals so that your Pi will detect all of the peripherals properly on boot.
Step 6: Connect your Pi to the Internet.
I recommend you to connect your Pi to the Internet so that you can easily add game ROMs and access additional features such as game rating and description scraping. Furthermore, connecting the Pi to your network also gives you the platform to access it remotely via SSH so as to perform the remaining configuration without the demand or need of a keyboard.
N/B: If you have a Raspberry Pi Zero W, Raspberry Pi 3, or newer, you have built-in Wi-Fi!
Simply connect by selecting the RetroPie menu icon and then select WIFI.
Then, connect to your Pi remotely via SSH by opening Terminal (Mac) or Command Prompt (Windows) and then running:
ssh pi@retropie
# Default password: Raspberry. This is how you can connect to a Raspberry Pi Remotely via SSH. Note: in case you are using an older Pi or one without built-in Wi-Fi, you can still transfer ROMs via USB. But if you still want to add Internet functionality to one of these older Pis, simply connect an Ethernet cable or USB Wi-Fi dongle.
Step 7: Extend your SD card to utilize all usable space.
Assuming the SD card is larger than 4GB then you must expand it before your Pi makes use of the remaining space. However, to do this, you are required to launch the Raspberry Pi configuration tool (raspi-config).
Reason: You can use the RetroPie interface to select the RetroPie menu icon and then select RASPI-CONFIG On the main screen.
Then, choose either to expand the File system or expand rootfs from the menu which tarries based on your Raspberry Pi model. Afterward, you now need to restart your Pi.
Note: unless you’ve added one you may not have noticed there’s no reset button.
Step8: connect to your Pi
On this ground, you need to connect to your Raspberry Pi from your computer so that we can copy over game ROMs so as to easily edit configuration files.
Most times this step is optional because you can also transfer ROMs via USB and accessing your configuration and other additional features aren’t strictly required.
There are several ways to do this in which one of the methods is via SSH/SFTP using an FTP client. However, I recommend Filezilla since it is very well documented and also available for both Mac and Windows.
You can download Filezilla via the download page and install it. Ensure you scale through the “additional components” that Filezilla will ask you to install, such as the Yahoo search page and toolbar crap.
Below is a guide to connecting your PI. The default Pi username and password are stated below respectively.
Step 9: configure your controller
Now that you want to configure your USB gamepad to work with the PI, I recommend the Buffalo Classic USB Gamepad because is highly compatible with the PI and slightly expensive though.
You can use any type of USB controller such as a USB NES controller.
However, to configure your controller to work with the menu system and games, kindly boot up your Pi. Automatically your Pi will launch the RetroPie UI at the pace where you will be prompted to configure the controller.
Step 10: Find and install game ROMs
At first, what is ROM? A ROM is an entire port of a particular video game. Furthermore, RetroPie contains a copy of Emulation Station which provides both the user interface for your new retro gaming rig and also interprets these ROM files appropriately. However, RetroPie comes with a few games preinstalled such as Quake, Duke Nukem 3D, and Cave Story.
NOTE: While you can find tons of RetroPie ROMs on any Torrent site, ensure that you do not download any copyrighted titles.
from WordPress https://ift.tt/382wd1C
No comments:
Post a Comment